Wednesday 30 April 2014

PI6ZTM antennas at 66 meters altitude

This is a picture taken from the top of the "Blankaard". On top of this building is the location of the antennas of the ATV repeater PI6ZTM in Zoetermeer. At an altitude of 66 meter it provides an excellent overview of the surrounding area.
My attention was attracted by the horizontal polarized 23 cm 4 x double-quad antenna (the white box in the middle). It is good to see this 23cm antenna setup which made reception of my small 1255 MHz ATV signal possible.


All tech details can be found here:
http://www.pi6ztm.nl/index.php/technische-informatie

Sunday 27 April 2014

CW paddle

Unfortunately I do not "speak" morse. In the past I tried to learn it several times, but I never managed to control morse. For training excercises I once built a CW paddle. It is a rather easy design. You only need some unetched PCB and small material.
I remember it was great fun to construct it.
By the way, I sometimes make CW QSOs while using computerprogramms like CWget. But that is not really fair :-)


Thursday 24 April 2014

35 MHz frequency counter

One of the most useful tools for a radio operator is a frequency counter. With PIC's available these days it is not that difficult to build one yourself. The counter presented here makes use of a 1x16 character display HD44780. 
Those displays are for sale for appr. $2.50 at eBay. A PIC 16F628A, a 4 MHz xtal and some discrete components is all you further need.


The design comes from Asia: http://www.hamradio.in/circuits/freq_counter_lcd.php
The HEX-code for the PIC is shown at the bottom of the webpage. The design allows you to set a lot of different IF frequencies (including IF = 0 Hz).


I was really surprised to see that the counter could measure frequencies much higher than 35 MHz. In this case a frequency in the 4 meter band (70 MHz) is shown.  


Note: According to Rinus Jansen from Kent Electronics the higher max. input frequency can be explained by the fact that a -628A pic instead of the old -84 pic is used.

Friday 18 April 2014

Radio Twenthe

Yesterday we went to the city of Den Haag to do some shopping.
Since I ran out of unetched PCB-materiaal and miniature switches I took the opportunity to buy some at the only electronics shop in the neighbourhood: Radio Twenthe at the Stille Veerkade.


Till some years ago in the area we had some nice shops with electronics: Radio Ster, Stuut & Bruin in Den Haag, Kok in Leiden, Radio Display in Utrecht. Since the lack of interest in homebuilding has increased and the possibility to buy components on the internet (eBay, marktplaats, dx.com etc. etc.) all those shops dissappeared.


As far as I remember Radio Twenthe has always been there; the owner told me that around 1960 the business started. They still have a large collection of vacuum tubes, DIY building kits, loudspeakers, switches, transformers, wiring etc.


Advertisement 1971:


You can approach Radio Twenthe via their (limited) website:
http://www.radiotwenthe.nl/


Thursday 17 April 2014

K150 USB PIC programmer

I could not withstand.
For 8 euro I bought the K150 USB PIC programmer on eBay. Programming software for this programmer is free of charge available on-line. Past years I made some nice designs containing PICs (like 16F628A, 16F877, 12F675) and programmed them with a simple home made programmer (in most cases succesful) connected to the PC’s serial port. It is time for a new programmer since my only PC with serial ports (very old :-)  ) suffers from old man diseases like very slow starting.
Now, I must exercise some patience before trying the device. Normally shipments from China take about 3 weeks before they arrive in Holland.


The features offered are very promising:
Features:
  • Support the most popular programming PIC chips, read, encryption and other features.
  • Power supply by USB cable.
  • Can easily read the contents of the chip program area.
  • Automatic programming verification.
  • Comprehensive information prompts, allowing users to understand the working state.
  • With 40pin ZIF programming of the seat, can be directly programmed in 8-pin to 40 pin PIC 8.microcontroller chip can be programmed using ICSP online or add conversion blocks.
  • 8 pin 40 pin-board outside the chip can be downloaded directly online ICSP output.
  • Compatible with Windows98 and Windows2000/NT, Windows XP / Windows 7 and other operating systems.
  • Programming software provides easy to use instructions


Wednesday 16 April 2014

Worlds smallest transceiver

Miguel, PY2OHH, has published the details of the “Pititico” (means very, very small in Portuguese)

This is an xtal-controlled, 1 transistor (2N3904 or similar NPN) , 40m CW-transceiver. TX output is 700 mW and audio is supplied through an earphone.
 
Interesting to read that Miguel has managed to make (at least 3) QSO’s with this tiny QRPp rig.
 
http://py2ohh.w2c.com.br/trx/pititico/pititico.html

Sunday 13 April 2014

Topband

Yesterday evening I had WSPR running at 160m. 
WSPR dial: 1.8366 MHz.
With the homemade magnetic loop antenna and 5 Watts RF following unique stations were noticed:


Saturday 12 April 2014

Progress Signal Function Generator

Two blog entries ago I informed you about the Bulgarian function generator.
This morning I was able to finish the circuit:


Some initial tests showed the circuit works. Below you see the generator supplying a nice sawtooth:


Measured upper frequency is appr. 265 kHz. Final steps are the +/- 12Vdc power supply and the casing.


Since I had the oscilloscope, a Handykit HKS130, in front of me, I took the opportunity to apply some contactspray into the potmeters. After all those years they needed this. This type of kits were popular in the 1975-1985 era. It was fun to glance at the contents of the kit and to see how the scope had been designed:


                                        Contents oscilloscope Handykit HKS130

Saturday 5 April 2014

80m WSPR with magnetic loop antenna

This morning I connected my forgotten magnetic loop antenna to the Yaesu FT450 for some WSPR trials on 80m. I made this (muliturn) magnetic loop antenna for 160m and 80m. On top there is a handmade varco to withstand the high voltages. The antenna does not look professional but it works. Tuning of this type of antennas is very critical because of the small bandwidth.


I inserted the well known 80m WSPR frequency of 3.592600 MHz into the Yaesu and the WSPR software. 


After half an hour operating at 5 Watts following stations popped up:


I will have WSPR running today to see how the antenna performs and have a look at changing propagation at 80m.

Update: It is good to see that even with a small indoor antenna and QRP power one can have a lot of radiofun. And even more, my house is 4 meters below sea-level ! Who said antennas must always be at high altitude ?

After a couple of hours WSPR-ing following unique stations have been identified


Wednesday 2 April 2014

Bulgarian Signal Function Generator

This DIY 
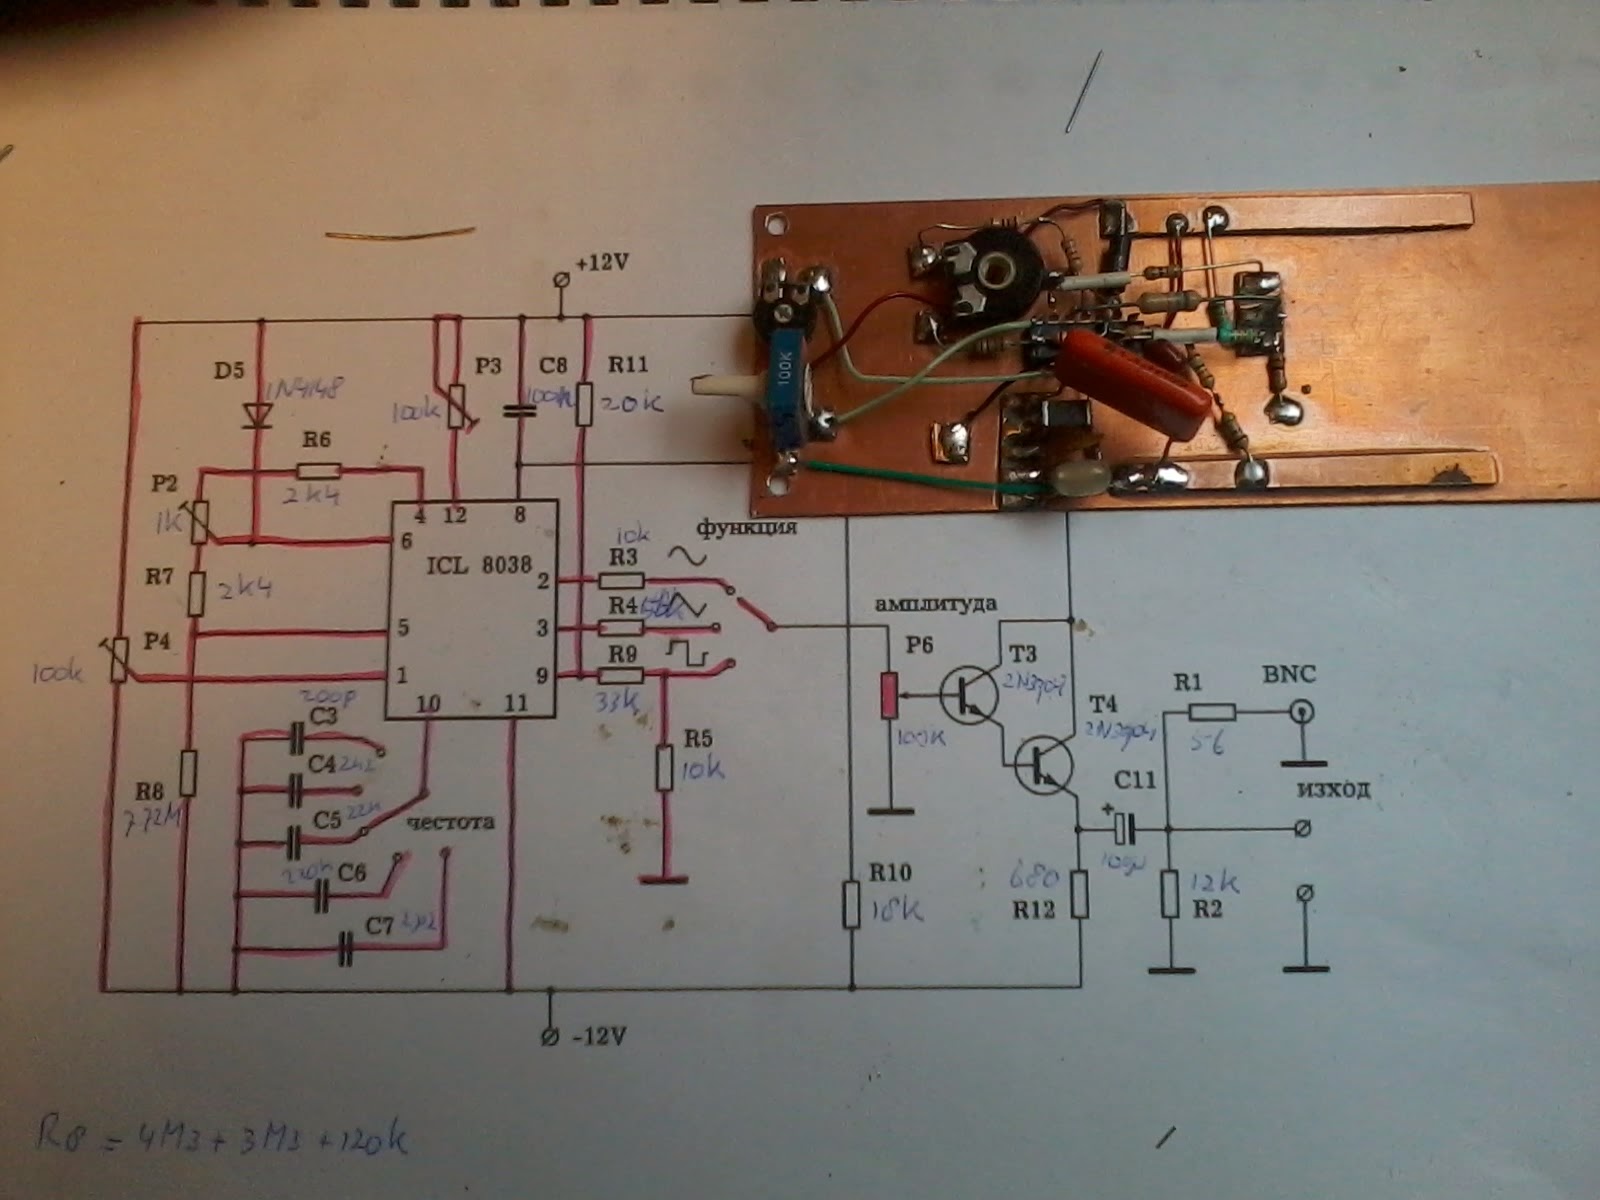
design from Bulgaria shows a versatile function generator. The circuit uses an Intersel IC ICL8038. Although it is an old design, this chip performs well and is still available (I ordered two of them at Kent Electronics for under 3 euro each). You can use the output signal for measurements or to modulate your transmitter under test.


The ICL8038 waveform generator is a monolithic integrated circuit capable of producing high accuracy sine, square, triangular, sawtooth and pulse waveforms with a minimum of external components. The frequency (or repetition rate) can be selected externally from 0.001Hz to more than 300kHz using either resistors or capacitors. FM (frequency modulation) and sweeping can be accomplished with an external voltage. The ICL8038 is fabricated with monolithic technology, using Schottky barrier diodes and thin film resistors, and the output is stable over a wide range of temperature and supply variations.
I found a simple design at http://www.constructor.bg/mk/testgen.htm
Google translator was able to convert the Bulgarian text to Dutch for me.  This made it possible to understand the labels.
The circuit uses + and - 12 VDC which you can produce with an 7812 and a 7912 voltage regulator.
Controls are as follows:
Selector switch to R3, R4, R9: Waveform
Selector switch to C3...C7:Frequency Adjustment, coarse
P5 / P1 : Frequency Adjustment, fine
P6 : Output level
P2: Symmetry
P3, P4: Linearity
Component values:
Resistors:  R1 - 56 , R2 - 12 к , R3 - 10 к , R4 - 56 к , R5 - 10 к , R6 - 2.4 к , R7 - 2.4 к ,
R8 - 7.72 M
( 4.3 M + 3.3 M + 120 к ), R9 - 33к , R10 - 18 к , R11 - 20 к , R12 - 680 ,
R13 - 220   
Potmeters: P1 - 1 к
, P2 - 1 к , P3 - 100 к , P4 - 100 к , P5 - 10 к , P6 - 100 к .
Capacitors: С3 - 200 pF, С4 - 2.2 nF, С5 - 22 nF, С6 - 220 nF, С7 - 2.2 u
F, С8 - 100 nF,  Ð¡11 - 100 uF.
Semiconductors: Т3 – 2N3904, Т4 – 2N3904


Generator under development